Uploading or Importing Your Contact List
Quickly and easily import your contacts into ConveYour

You can add contacts to ConveYour either individually or by importing a contact list.
Adding A Single Contact
To add an individual contact:
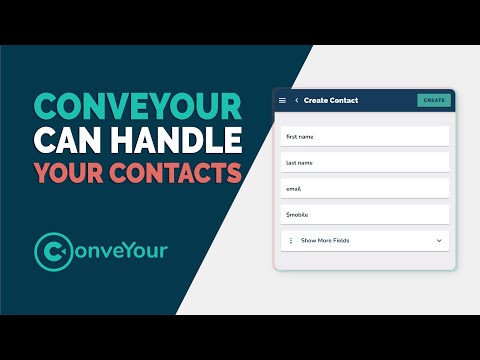
Go to Contacts and click New Contact from the top menu bar.
Enter the required information:
First Name
Last Name
Mobile Number
Email
Click Create in the top menu bar to save the contact.
Need additional fields? Click Show More Fields to add relevant contact details. Sign up for a ConveYour mini-course on working with contacts here.
Adding More Than One Contact
STEP ONE: Exporting Your Contacts to .CSV
Before importing, prepare your data by exporting your contacts as a CSV (comma-separated values) file from your email client or CRM.
STEP TWO: Preparing Data for Import Into ConveYour
Check Required Fields: Ensure your file includes at least First Name and Email columns.
Standard Field Mapping: ConveYour recognizes common fields such as:
First Name
Last Name
Email
Mobile Number
Splitting Name Columns: If names are in a single column (e.g., "John Smith"), separate them into First Name and Last Name to allow for personalized messaging.
Remove Unnecessary Columns: If certain data (e.g., physical addresses) isn't needed, remove those columns for a cleaner import.
Keep Key Differentiators: Retain columns that will help categorize contacts (e.g., department, role, or location). If a required field isn’t available in ConveYour, add it as a custom field before importing.
Note: It is helpful to make a copy of the original data spreadsheet before making modifications. If your team needs the raw data later, you will have it in unmodified form.
STEP THREE: Importing Your Contacts
To import your contact list:
Navigate to Contacts and click Import Contacts from the top menu bar.
Upload your CSV file exported from your email database or CRM.
Map your data fields to ConveYour’s fields.
Where Do Imported Contacts Go?
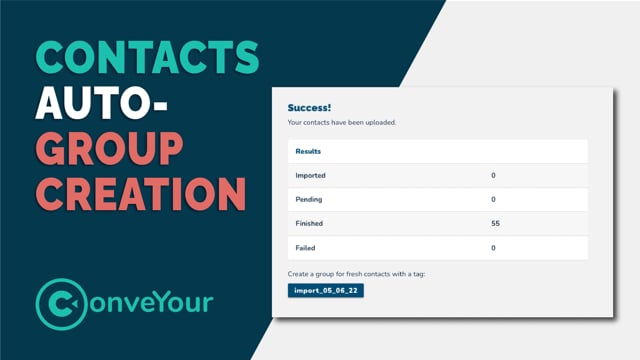
Once uploaded, contacts are added to your master list in ConveYour. Additionally, they are:
Automatically tagged with today’s date.
Grouped together for easy reference.
To access the newly created group, click the blue button with today’s date that appears below your import stats.
Rename the Group: Adjust the default group name for better organization.
Message the Group: Send a bulk message from the group’s menu.
Apply Automations: Enroll the group into a course or campaign.
Learn more about working with groups here >>
Learn more about using an automation to add this group to a course/campaign >>
Handling Large Imports & Duplicate Records
Big imports? No problem!
Our system supports imports of over 3 million records in a single upload.
Duplicate Contact Handling
ConveYour automatically merges contacts with the same email address to prevent duplicates.
Mobile numbers also serve as a unique identifier for merging records.
If your database has a unique custom identifier, we can configure it as a key field for future imports.
Learn More
Removing Contacts from a course/Campaign Using an Automation
Learn More About Creating Custom Fields
Helpful Resources for Exporting Contacts from Popular Platforms (As Of 9/21/21):
Helpful Article On Exporting contacts as .csv from Various Email Softwares
More in Contacts
Contacts
An Overview of Contacts
Introduction to working with contacts in ConveYour
Contacts
Automatic Group Creation on Upload
ConveYour automatically tags and creates a group when you upload a database list of contacts

Contacts
Boards
Tracking process or activities for contacts using ConveYour Contact Boards
Contacts
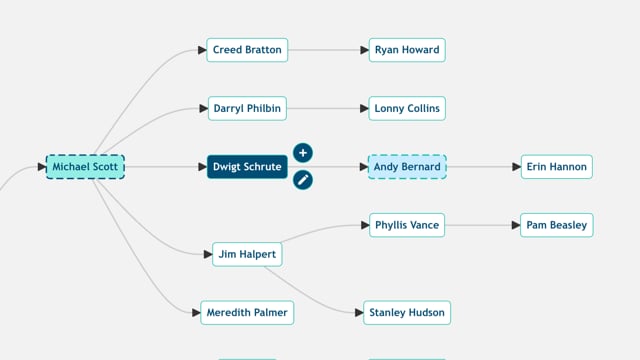
Contact Relationships
Contact Relationships allow you to view your org chart (or downlines as a hierarchical tree)! You can easily see which contacts are recruiters, supervisors, or managers based on your related contact fields.